How to scan and decode a linear keypad with Arduino and C++
(Para español, click aquí)
A very common task in our electronic projects is reading and decoding small keypads. These can be physically implemented in various ways:
- as a group of switches,
- as an analog ladder,
- as touch buttons.
In this article I want to show you how to scan and decode single-press and long-press keypads (repetitions included!).
Introducción
Keypads can also be presented in linear or matrix form. The latter helps save a lot of microcontroller pins when you have a lot of keys, but its scanning and decoding is more elaborate as well.
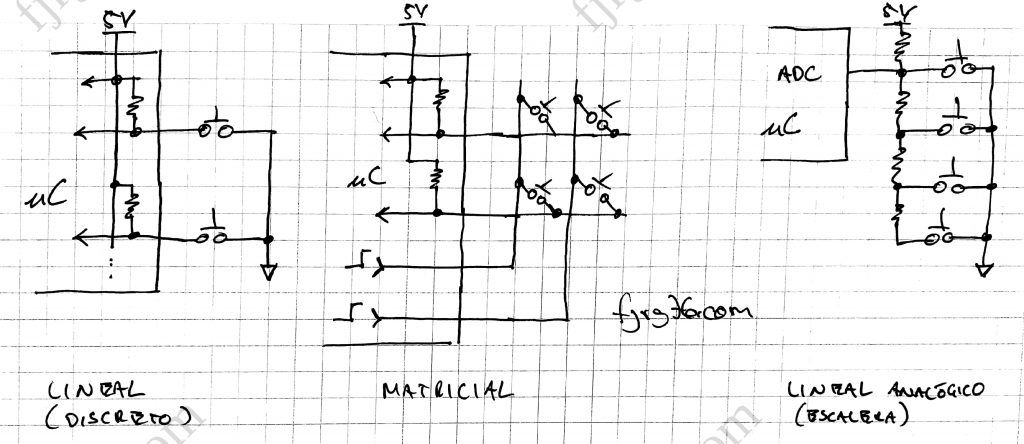
Each type of keypad is scanned and decoded differently depending on its technology; In this article I will talk about linear keypads with switches, because it is the easiest and most extended way and does not depend on esoteric characteristics (touch module) that are not present in all microcontrollers, but only uses common GPIO terminals (input and output pins).
(It is possible to implement a touch keypad using analog inputs and microcontroller GPIOs, but that is the subject of another article. If you want me to write about it, let me know in the comments.)
(The terms switch and key are synonymous and I will be using them interchangeably.)
It is also very important to know that in a linear keypad each switch corresponds to an input pin; if you have 5 keys then you will use 5 pins. However, the sequence of the pins does not have to be consecutive; for example, on a 4-switch keypad you could set the K1, K2, K3, and K4 keys to map to pins D9, D2, D14, and D12.
For the example to be developed later we are going to declare a global array of 4 pins:
uint8_t keypad_keys[4]={ 8, 14, 15, 16 };
As you can see, the numbers are not in strict sequence because it is not necessary. Of course you can set both a different sequence, as well as a greater or lesser number of keys according to your needs.
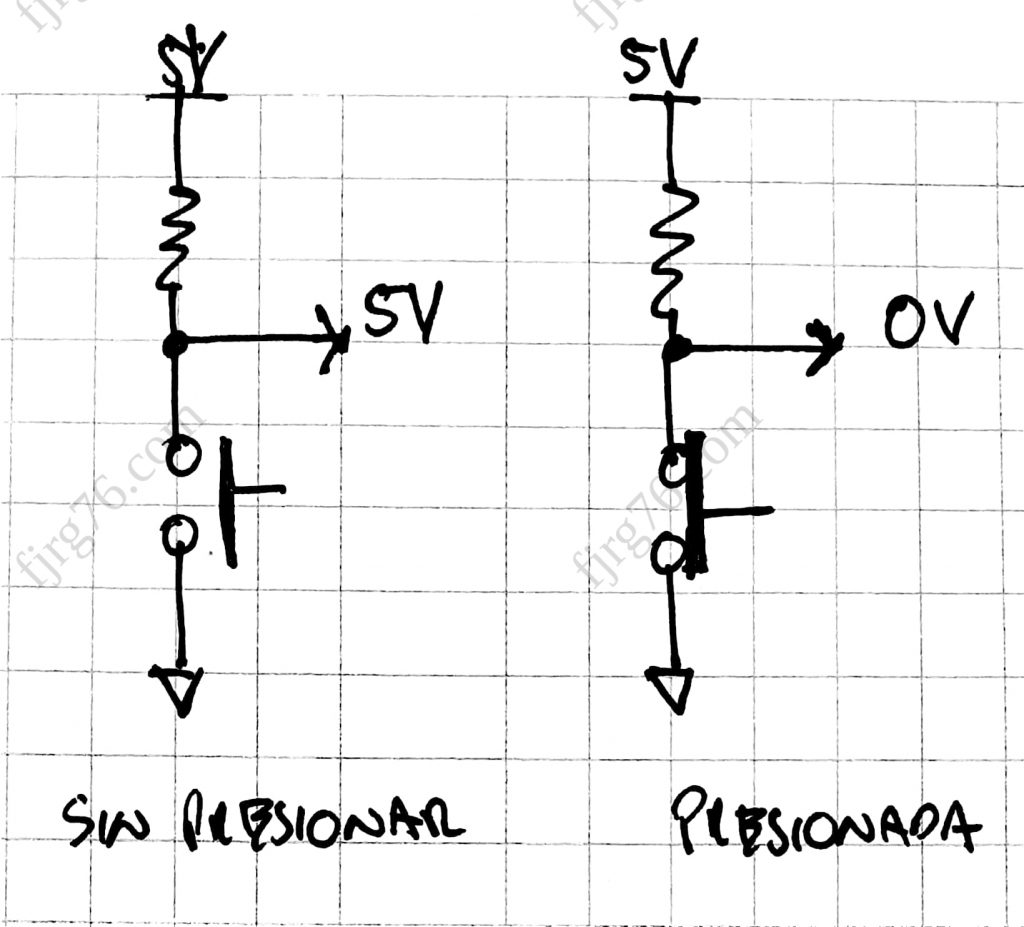
Then, before scanning and decoding the keypad, you need to configure the previously assigned pins as input terminals, with the internal pull-up resistor activated:
   for( uint8_t i = 0; i < this->num_keys; ++i )
   {
      pinMode( keys[ i ], INPUT_PULLUP );
   }
When a key is not being pressed it “delivers” a high level to the microcontroller (thanks to the pull-up resistor); when the key is pressed, the microcontroller observes a low level because the internal pull-up resistor has been connected to 0V. (Most microcontrollers provide an internal pull-up resistor and its value is sufficient to implement a keypad, so you don’t need to add resistors to your Bill Of Materials.)
State machine
Keypad decoding goes through several states, and we are going to need a state machine to process each of them. But before going into the details of such a machine, it is interesting to know why we need it and not simply dedicate ourselves to reading directly the status corresponding to each of the keys.
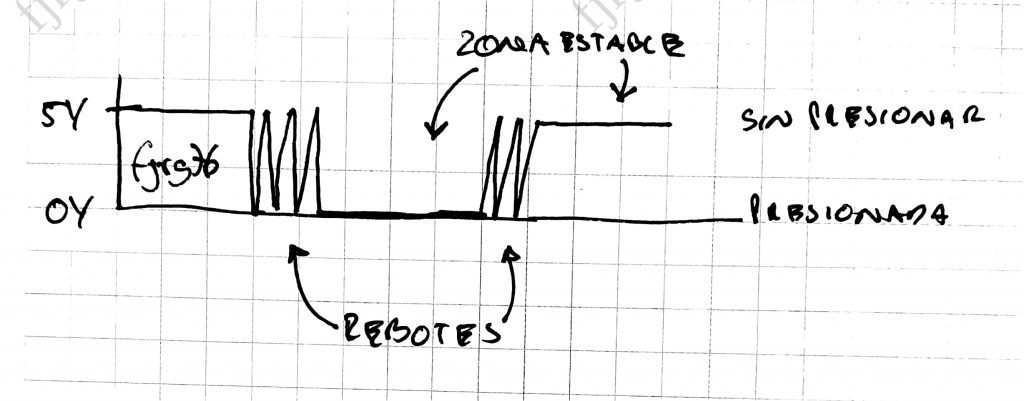
Bouncing
It is important to know that mechanical switches have bounces, and these bounces will cause a keypad press to appear multiple times. That is why it will always be necessary to get rid of them.
You can eliminate bouncing at the hardware level by placing a 100n capacitor in parallel with each switch; however, this solution involves more components, more costs, and more space on the printed circuit.
Software anti-debouncing
We can achieve the same result with software: you detect the first time a key is pressed and save its code; then you let time pass; and finally you ask again for the status of the key. If the key is still pressed, then you give by valid the key; otherwise, you ignore it and prepare to repeat the cycle. The time you let go will “absorb” the rebounds; and if the user releases the key before the time expires, then the key will not be reported as pressed.
As life is not that simple when you release the key, it also generates bounces that could be interpreted as a new pressure. To avoid this situation we must add another state (state 3 in the below state machine): in this one we will let a time pass since the key was released, «absorbing» again the bounces.
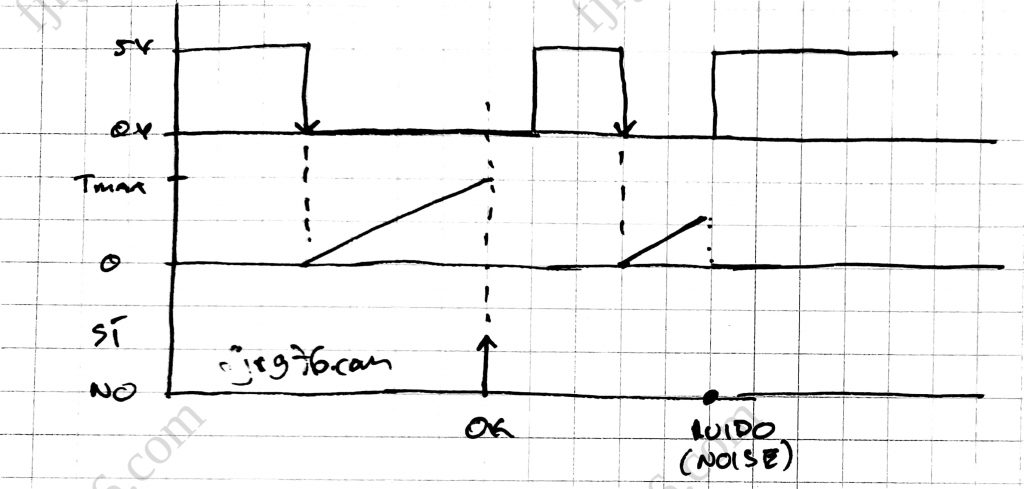
The graphic description of the state machine corresponding to the previous time diagram is as follows:
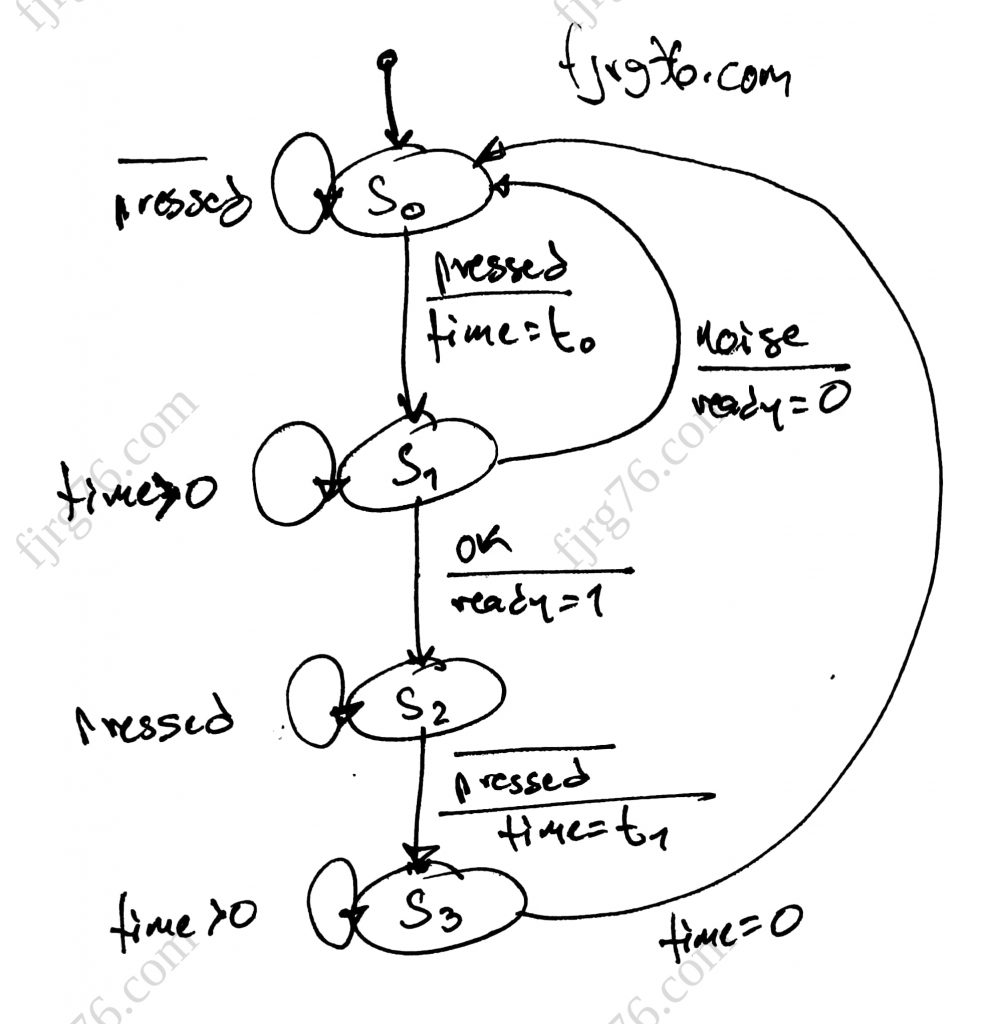
Some implementations report the pressed key when the anti-bounce time has elapsed; while others when the key has been released. I like to use the first form, but if you wish, with minor modifications you could implement the second one.
Once we have established the way in which the scanning and decoding is carried out, we finally arrive at the state machine, which does look like this:
void Keypad::state_machine()
{
   static uint8_t state = 0;
   static uint16_t ticks = 0;

   switch( state )
   {
      case 0:
         this->key = read_array();

         if( this->key < this->num_keys )
         {
            ticks = ANTI_DEBOUNCE_TIME_LOW;
            this->ready = false;
            state = 1;

            //Serial.println( "s0->s1" );
         }
         break;

      case 1:
         --ticks;
         if( ticks == 0 )
         {
            if( digitalRead( this->keys[ this->key ] ) == LOW )
            {
               this->ready = true;
               state = 2;

               //Serial.println( "s1->s2" );
            }
            else // noise:
            {
               state = 0;

               //Serial.println( "s1->s0" );
            }
         }
         break;

      case 2:
         if( digitalRead( this->keys[ this->key ] ) == HIGH )
         {
            ticks = ANTI_DEBOUNCE_TIME_HIGH;
            state = 3;

            //Serial.println( "s2->s3" );
         }
         break;

      case 3:
         --ticks;
         if( ticks == 0 )
         {
            state = 0;

            //Serial.println( "s3->s0" );
         }
         break;

      default:
         state = 0;
         ticks = 0;
         this->ready = false;

         //Serial.println( "def->s0" );
         break;
   }
}
In the previous code I left some debugging aids (Serial.println() sentences that you should uncomment) in case you want to see how the state machine evolves every time you press a key.
It is very important that you call the state machine periodically; otherwise the behavior will be erratic and you may miss some events. In the full example below I’ll show you one way to do it.
We are almost done. It remains to mention the function that the client of the keypad module will use every time she wants to know if a key was pressed, or not:
uint8_t Keypad::read()
{
   uint8_t ret_val = eKeys::NO_KEY;

   if( this->ready )
   {
      this->ready = false;
      ret_val = this->key;
   }
   return ret_val;
}
Complete code
You can see the complete code of the keypad scanning and decoding module along with a sample of its use in the following sketch:
/*Copyright (C)
 *
 * 2021 - fjrg76 at hotmail dot com (fjrg76.com)
 * This program is free software; you can redistribute it and/or
 * modify it under the terms of the GNU General Public License
 * as published by the Free Software Foundation; either version 2
 * of the License, or (at your option) any later version.
 *
 * This program is distributed in the hope that it will be useful,
 * but WITHOUT ANY WARRANTY; without even the implied warranty of
 * MERCHANTABILITY or FITNESS FOR A PARTICULAR PURPOSE.  See the
 * GNU General Public License for more details.
 *
 * You should have received a copy of the GNU General Public License
 * along with this program; if not, write to the Free Software
 * Foundation, Inc., 59 Temple Place - Suite 330, Boston, MA  02111-1307, USA.
 *
 */

#include <stdint.h>
// for uint8_t, uint16_t, etc

#define TICK_PERIOD 5 // ms

#define NUM_KEYS 4
#define ANTI_DEBOUNCE_TIME_LOW  ( 100 / TICK_PERIOD )
#define ANTI_DEBOUNCE_TIME_HIGH ( 200 / TICK_PERIOD )

constexpr uint8_t keys_array[ NUM_KEYS ] = { 8, 14, 15, 16 };

class Keypad
{
public:
   enum eKeys{ KEY_A, KEY_B, KEY_C, KEY_D, NO_KEY };

private:
   uint8_t* keys{ nullptr };
   uint8_t  num_keys{ 0 };
   uint8_t  key{ 0 };
   bool     ready{ false };

public:
   Keypad();

   // copies are not allowed:
   Keypad( Keypad& ) = delete;
   Keypad& operator=( Keypad& ) = delete;

   void init( uint8_t* keys, uint8_t num_keys );
   void state_machine();
   uint8_t read();

private:
   uint8_t read_array();
};

Keypad::Keypad()
{
   // nothing; all initialisations were carried out in the class body (as C++11 already allows it)
}

void Keypad::init( uint8_t* keys, uint8_t num_keys )
{
   this->keys = keys;
   this->num_keys = num_keys;

   for( uint8_t i = 0; i < this->num_keys; ++i )
   {
      pinMode( keys[ i ], INPUT_PULLUP );
   }
}

uint8_t Keypad::read_array()
{
   uint8_t cont;
   for( cont = 0; cont < this->num_keys; ++cont )
   {
      if( digitalRead( this->keys[ cont ] ) == LOW )
      {
         break;
      }
   }
   return cont;
}

void Keypad::state_machine()
{
   static uint8_t state = 0;
   static uint16_t ticks = 0;

   switch( state )
   {
      case 0:
         this->key = read_array();

         if( this->key < this->num_keys )
         {
            ticks = ANTI_DEBOUNCE_TIME_LOW;
            this->ready = false;
            state = 1;

            //Serial.println( "s0->s1" );
         }
         break;

      case 1:
         --ticks;
         if( ticks == 0 )
         {
            if( digitalRead( this->keys[ this->key ] ) == LOW )
            {
               this->ready = true;
               state = 2;

               //Serial.println( "s1->s2" );
            }
            else // noise:
            {
               state = 0;

               //Serial.println( "s1->s0" );
            }
         }
         break;

      case 2:
         if( digitalRead( this->keys[ this->key ] ) == HIGH )
         {
            ticks = ANTI_DEBOUNCE_TIME_HIGH;
            state = 3;

            //Serial.println( "s2->s3" );
         }
         break;

      case 3:
         --ticks;
         if( ticks == 0 )
         {
            state = 0;

            //Serial.println( "s3->s0" );
         }
         break;

      default:
         state = 0;
         ticks = 0;
         this->ready = false;

         //Serial.println( "def->s0" );
         break;
   }
}

uint8_t Keypad::read()
{
   uint8_t ret_val = eKeys::NO_KEY;

   if( this->ready )
   {
      this->ready = false;
      ret_val = this->key;
   }
   return ret_val;
}


Keypad keypad;
// the Keypad object is just created


void setup()
{
   keypad.init( keys_array, NUM_KEYS );
   Serial.begin( 115200 );
}

void loop()
{
   static unsigned long prev = 0;
   auto now = millis();

   if ( now - prev >= ( TICK_PERIOD ) )
   {
      prev = now;
      keypad.state_machine();
   }


//-------------------------------------------------

   uint8_t pressed_key = keypad.read();
   if( pressed_key != Keypad::eKeys::NO_KEY )
   {
      Serial.println( pressed_key );

      switch( pressed_key )
      {
         case Keypad::eKeys::KEY_A:
            Serial.println( "Key A" );
            break;

         case Keypad::eKeys::KEY_B:
            Serial.println( "Key B" );
            break;

         case Keypad::eKeys::KEY_C:
            Serial.println( "Key C" );
            break;

         case Keypad::eKeys::KEY_D:
            Serial.println( "Key D" );
            break;

         default:
            Serial.println( "Not a key" );
            break;
      }
   }
}
As you may have noticed, I have implemented this keypad module completely in C++. Of course it could also be done in C, but Arduino uses C++ as its underlying programming language, so why to bother with two languages?
Here let me give you a tip: if the module you are developing uses state variables, then your module is a perfect candidate to be coded in C ++ with classes, and not just C.
State variable: State variables are the subset of variables of a system that can represent its complete dynamic state at a given moment.[WIKIPEDIA]
The keypad module uses two kinds of state variables:
- State variables that are required throughout the life of the
Keypadobject (that is, all variables declared in theprivateblock of the class), and - State variables that are not intrinsic part of the
Keypadclass, such as the state variables and ticks in theKeypad::state_machine()function. Since the keypad does not need them for anything outside of the state machine, then they might be local (andstatic, so that they store their values between calls) to that function.
The client code uses 4 functions of the Keypad class:
Keypad::Keypad()(that is, the constructor) to create an object of typeKeypad, but not serving anything else (for now). The object is declared with global visibility (it’s the only global variable in the example, how wonderful is that!)Keypad::init()to associate an array of keys and their number with the previously createdKeypadobject. This function is called in the Arduinosetup()function. The array of keys can be declared asstaticinside theinit()function as well, instead of being global.Keypad::state_machine()is the function that scans and decodes the keypad. It is called in the Arduinoloop()function, and must be called periodically in that function.Keypad::read()is the function that the keypad client will use to actually read the keypad. Once a key has been properly recognized, then a C’sswitchis passed to execute the corresponding code. It can be called within the Arduinoloop()function, or any other, as long as the keypad has already been initialized and is being decoded periodically.
Long pressures and repetitions
And that was it?
No, we can also add long presses (as in «Press the button for 2 seconds«) and repetitions (as in «Leave the button pressed for the minutes to increase automatically» when you’re setting the time in your beautiful digital wrist-watch).
Of course these new features add complexity to the design, but hey, what would life be like if everything were easy!
To implement both features we will have to add new state variables to the class, new symbolic constants and modify the behavior of the state machine, since now it will have to decode four states through which a pressed key could pass:
- It was noise and it is not done nothing,
- Short press,
- Long press, and
- Continuous pressure (repetitions).
Let’s see how the Keypad class looks first:
class Keypad
{
public:
   enum eKeys{ KEY_A, KEY_B, KEY_C, KEY_D, NO_KEY };
   enum eType { SHORT, LONG, REPS };

   typedef struct
   {
      uint8_t key;
      eType type;
   } Key;

private:
   uint8_t* keys{nullptr};
   uint8_t num_keys{0};
   bool ready{false};
   uint8_t key{0};
   uint8_t type{eType::SHORT};

public:
   Keypad();

   // no se permiten las copias:
   Keypad( Keypad& ) = delete;
   Keypad& operator=( Keypad& ) = delete;

   void init( uint8_t* keys, uint8_t num_keys );
   void state_machine();
   bool read( Keypad::Key* key );

private:
   uint8_t read_array();
};
In particular, take a look at the (key, type) pair. Every time the module reports a key, it must also report the type of pressure (type: SHORT, LONG and REPS).
Modified state machine
Then we have the state machine in which we’ve added 2 more states. Pay attention to the fact that in most states now we read when the key was released.
void Keypad::state_machine()
{
   static uint8_t state = 0;
   static uint16_t ticks = 0;

   switch( state )
   {
      case 0:
         this->key = read_array();
         if( this->key < this->num_keys )
         {
            ticks = ANTI_DEBOUNCE_TIME_LOW;
            this->ready = false;
            state = 1;

            //Serial.println( "s0->s1" );
         }
         break;

      case 1:
         --ticks;
         if( ticks == 0 )
         {
            if( digitalRead( this->keys[ this->key ] ) == LOW )
            {
               ticks = ANTI_DEBOUNCE_TIME_LONG;
               state = 2;

               //Serial.println( "s1->s2" );
            }
            else
            {
               ticks = ANTI_DEBOUNCE_TIME_HIGH;
               state = 4;

               //Serial.println( "s1->s4" );
            }
         }
         break;

      case 2:
         if( digitalRead( this->keys[ this->key ] ) == LOW )
         {
            --ticks;
            if( ticks == 0 )
            {
               this->type = eType::LONG;
               this->ready = true;
               ticks = ANTI_DEBOUNCE_TIME_BEFORE_REPS;
               state = 3;

               //Serial.println( "s2->s3" );
            }
         }
         else
         {
            this->type = eType::SHORT;
            this->ready = true;
            ticks = ANTI_DEBOUNCE_TIME_HIGH;
            state = 4;

            //Serial.println( "s2->s4" );
         }
         break;

      case 3:
         if( digitalRead( this->keys[ this->key ] ) == LOW )
         {
            --ticks;
            if( ticks == 0 )
            {
               this->type = eType::REPS;
               this->ready = true;
               ticks = ANTI_DEBOUNCE_TIME_LOW;
               state = 5;

               //Serial.println( "s3->s5" );
            }
         }
         else
         {
            ticks = ANTI_DEBOUNCE_TIME_HIGH;
            state = 4;

            //Serial.println( "s3->s4" );
         }
         break;

      case 4:
         --ticks;
         if( ticks == 0 )
         {
            state = 0;

            //Serial.println( "s4->s0" );
         }
         break;

      case 5:
         if( digitalRead( this->keys[ this->key ] ) == LOW )
         {
            --ticks;
            if( ticks == 0 )
            {
               this->type = eType::REPS;
               this->ready = true;
               ticks = ANTI_DEBOUNCE_TIME_LOW;

               //Serial.println( "s5->s5" );
            }
         }
         else
         {
            ticks = ANTI_DEBOUNCE_TIME_HIGH;
            state = 4;

            //Serial.println( "s5->s4" );
         }
         break;

      default:
         state = 0;
         ticks = 0;
         this->ready = false;

         //Serial.println( "def->s0" );
         break;
   }
}
More complicated, isn’t it? If you find a simpler way to do the same, let me know in the comments!
To better understand the sequence of states above, the following timing diagram migh help you (it helped me a lot when I was designing and coding the keypad module!):
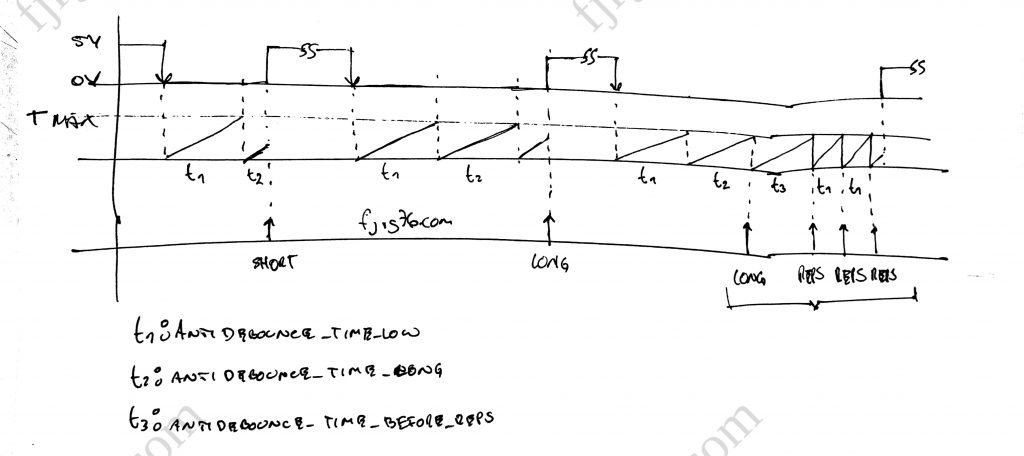
Client’s interface
And finally, the module has to deliver its report to the client. Remember that now the client has 4 options for the same key: it was noise, it was short pressure, it was long pressure and it was continuous pressure.
bool Keypad::read( Keypad::Key* k )
{
   bool ret_val = false;

   if( this->ready )
   {
      this->ready = false;

      k->key = this->key;
      k->type = this->type;

      this->type = eType::SHORT;
      ret_val = true;
   }
   return ret_val;
}
Complete example
The code, including an example of how the user could make use of the new functionalities, looks like this:
/*Copyright (C)
 *
 * 2021 - fjrg76 at hotmail dot com (fjrg76.com)
 * This program is free software; you can redistribute it and/or
 * modify it under the terms of the GNU General Public License
 * as published by the Free Software Foundation; either version 2
 * of the License, or (at your option) any later version.
 *
 * This program is distributed in the hope that it will be useful,
 * but WITHOUT ANY WARRANTY; without even the implied warranty of
 * MERCHANTABILITY or FITNESS FOR A PARTICULAR PURPOSE.  See the
 * GNU General Public License for more details.
 *
 * You should have received a copy of the GNU General Public License
 * along with this program; if not, write to the Free Software
 * Foundation, Inc., 59 Temple Place - Suite 330, Boston, MA  02111-1307, USA.
 *
 */

#include <stdint.h>
// for uint8_t, uint16_t, etc

#define TICK_PERIOD 5 // ms

#define NUM_KEYS 4
#define ANTI_DEBOUNCE_TIME_LOW  ( 100 / TICK_PERIOD )
#define ANTI_DEBOUNCE_TIME_HIGH ( 200 / TICK_PERIOD )
#define ANTI_DEBOUNCE_TIME_LONG ( ( 2000 - ANTI_DEBOUNCE_TIME_LOW ) / TICK_PERIOD )
#define ANTI_DEBOUNCE_TIME_BEFORE_REPS ( ANTI_DEBOUNCE_TIME_LOW * 10 )

constexpr uint8_t keys_array[ NUM_KEYS ] = { 8, 14, 15, 16 };


class Keypad
{
public:
   enum eKeys{ KEY_A, KEY_B, KEY_C, KEY_D, NO_KEY };
   enum eType { SHORT, LONG, REPS };

   typedef struct
   {
      uint8_t key;
      eType   type;
   } Key;

private:
   uint8_t* keys{nullptr};
   uint8_t  num_keys{0};
   bool     ready{false};
   uint8_t  key{0};
   uint8_t  type{eType::SHORT};

public:
   Keypad();

   // no se permiten las copias:
   Keypad( Keypad& ) = delete;
   Keypad& operator=( Keypad& ) = delete;

   void init( uint8_t* keys, uint8_t num_keys );
   void state_machine();
   bool read( Keypad::Key* key );

private:
   uint8_t read_array();
};

Keypad::Keypad()
{
   // nada (nothing)
}

void Keypad::init( uint8_t* keys, uint8_t num_keys )
{
   this->keys = keys;
   this->num_keys = num_keys;

   for( uint8_t i = 0; i < this->num_keys; ++i )
   {
      pinMode( keys[ i ], INPUT_PULLUP );
   }
}

uint8_t Keypad::read_array()
{
   uint8_t cont;
   for( cont = 0; cont < this->num_keys; ++cont )
   {
      if( digitalRead( this->keys[ cont ] ) == LOW )
      {
         break;
      }
   }
   return cont;
}

void Keypad::state_machine()
{
   static uint8_t state = 0;
   static uint16_t ticks = 0;

   switch( state )
   {
      case 0:
         this->key = read_array();
         if( this->key < this->num_keys )
         {
            ticks = ANTI_DEBOUNCE_TIME_LOW;
            this->ready = false;
            state = 1;

            //Serial.println( "s0->s1" );
         }
         break;

      case 1:
         --ticks;
         if( ticks == 0 )
         {
            if( digitalRead( this->keys[ this->key ] ) == LOW )
            {
               ticks = ANTI_DEBOUNCE_TIME_LONG;
               state = 2;

               //Serial.println( "s1->s2" );
            }
            else
            {
               ticks = ANTI_DEBOUNCE_TIME_HIGH;
               state = 4;

               //Serial.println( "s1->s4" );
            }
         }
         break;

      case 2:
         if( digitalRead( this->keys[ this->key ] ) == LOW )
         {
            --ticks;
            if( ticks == 0 )
            {
               this->type = eType::LONG;
               this->ready = true;
               ticks = ANTI_DEBOUNCE_TIME_BEFORE_REPS;
               state = 3;

               //Serial.println( "s2->s3" );
            }
         }
         else
         {
            this->type = eType::SHORT;
            this->ready = true;
            ticks = ANTI_DEBOUNCE_TIME_HIGH;
            state = 4;

            //Serial.println( "s2->s4" );
         }
         break;

      case 3:
         if( digitalRead( this->keys[ this->key ] ) == LOW )
         {
            --ticks;
            if( ticks == 0 )
            {
               this->type = eType::REPS;
               this->ready = true;
               ticks = ANTI_DEBOUNCE_TIME_LOW;
               state = 5;

               //Serial.println( "s3->s5" );
            }
         }
         else
         {
            ticks = ANTI_DEBOUNCE_TIME_HIGH;
            state = 4;

            //Serial.println( "s3->s4" );
         }
         break;

      case 4:
         --ticks;
         if( ticks == 0 )
         {
            state = 0;

            //Serial.println( "s4->s0" );
         }
         break;

      case 5:
         if( digitalRead( this->keys[ this->key ] ) == LOW )
         {
            --ticks;
            if( ticks == 0 )
            {
               this->type = eType::REPS;
               this->ready = true;
               ticks = ANTI_DEBOUNCE_TIME_LOW;

               //Serial.println( "s5->s5" );
            }
         }
         else
         {
            ticks = ANTI_DEBOUNCE_TIME_HIGH;
            state = 4;

            //Serial.println( "s5->s4" );
         }
         break;

      default:
         state = 0;
         ticks = 0;
         this->ready = false;

         //Serial.println( "def->s0" );
         break;
   }
}

bool Keypad::read( Keypad::Key* k )
{
   bool ret_val = false;

   if( this->ready )
   {
      this->ready = false;

      k->key = this->key;
      k->type = this->type;

      this->type = eType::SHORT;
      ret_val = true;
   }
   return ret_val;
}

Keypad keypad;
// we just create the object


void setup()
{
   keypad.init( keys_array, NUM_KEYS );
   Serial.begin( 115200 );
}

void loop()
{
   static unsigned long prev = 0;
   auto now = millis();

   if ( now - prev >= ( TICK_PERIOD ) )
   {
      prev = now;
      keypad.state_machine();
   }


//-------------------------------------------------------------------------------

   Keypad::Key k;
   if( keypad.read( &k ) == true )
   {
      switch ( k.type )
      {
         case Keypad::eType::SHORT:
            switch( k.key )
            {
               case Keypad::eKeys::KEY_A: Serial.println( "S:A" ); break;
               case Keypad::eKeys::KEY_B: Serial.println( "S:B" ); break;
               case Keypad::eKeys::KEY_C: Serial.println( "S:C" ); break;
               case Keypad::eKeys::KEY_D: Serial.println( "S:D" ); break;
            }
            break;

         case Keypad::eType::LONG:
            switch( k.key )
            {
               case Keypad::eKeys::KEY_A: Serial.println( "L:A" ); break;
               case Keypad::eKeys::KEY_B: Serial.println( "L:B" ); break;
               case Keypad::eKeys::KEY_C: Serial.println( "L:C" ); break;
               case Keypad::eKeys::KEY_D: Serial.println( "L:D" ); break;
            }
            break;

         case Keypad::eType::REPS:
            switch( k.key )
            {
               case Keypad::eKeys::KEY_A: Serial.println( "R:A" ); break;
               case Keypad::eKeys::KEY_B: Serial.println( "R:B" ); break;

               // you can use integers instead of enum constants:
               case 2: Serial.println( "R:C" ); break;
               case 3: Serial.println( "R:D" ); break;
            }
            break;
      }
   }
}
A run of the previous program, testing all the combinations, looks like this:
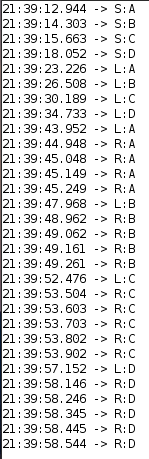
In the previous example the client first discriminated on the type of pressure (SHORT, LONG and REPS), and then on the key; however, it is also possible to do it the other way around: first discriminate on the key and then on the type. The form you use will depend on your application.
What’s next?
In this article we have seen two ways to code a linear keypad in Arduino: a simple way (one press), and a complete way (3 types of pressure).
In embedded systems, state machines and state variables are very important elements of programming. In today’s project we saw how to scan and decode the keypad using both tools.
Indeed, to code reliable applications under the awful Arduino’s super-loop model, one needs to design the programs using a lot of state machines.
The next step would be to transfer the code from the keypad to a C++ module (Keypad.cpp and Keypad.h) so that you can reuse it in all your projects, without the need to exercise an ugly copy-and-paste (I’ve already done it, and I leave it to you as an exercise).
I hope this article has helped you and that you will soon start using what we saw today in your projects.
Do you want to start writing real-time applications on Arduino UNO? Download my framework KleOS!
Here I explain how to download it in Windows. Of course it works for Linux too.
Here I show you how to make your first sketch with Arduino and KleOS.
If you liked the article, you may want to subscribe to the blog.

Mi perfil completo lo puede encontrar en: https://www.linkedin.com/in/fjrg76-dot-com/
- Arduino and ESP32 whims - diciembre 17, 2025
- Writing Scalable Firmware: Implementing the Command Pattern in C++ - diciembre 4, 2025
- Patrón de diseño de software Command para sistemas embebidos para los no iniciados - noviembre 30, 2025
1 COMENTARIO