FreeRTOS Software timers
(Lee este artículo en español aquí.)
Many of our applications are timely driven on a periodic basis: the display must be updated, the keyboard must be read, an ADC conversion must be done, etc.
In conventional programming (without any sort of operating system) we have been forced to create state machines within a periodic interrupt to process all these activities. And although this solution actually does work, it doesn’t scale very well.
On the other hand, when we use an operating system to handle these periodic tasks, we might create a task for each of them. Every task, no matter how simple it is (such as reading a keyboard or updating a display), consumes resources. And when you add them up, the system resources run out.
The idea behind software timers is to have a centralized task at the operating system level that manages the different user timers (yes, you can have as many timers as you want as long as the RAM memory doesn’t run out), reducing the cost of resources and simplifying the programming.
And for each timer you create you can specify what to do when the set time expires. Some timers can share the same code, or each one can have its own behaviour.
In this article we will see how you can use the FreeRTOS software timers in your real-time projects.
Tabla de contenidos
What is it and what do I need?
Software timers (from here on I will simply say timers) are a FreeRTOS mechanism that allows us to handle some activities in a timely manner very easily and with a minimum of resources. After activating this functionality, FreeRTOS will create a (hidden) task (the so called timer daemon) that will manage all and each of the timers that we have created, without our intervention.
Each timer can be started, stopped or restarted individually. Each of these actions (FreeRTOS tells them commands) can be launched by a callback itself, by another callback, or by another task (more on callbaks in an minute).
An interesting fact is that the timers do not depend on other tasks in the system (yours), which allows you to have a complete timer-based application without any tasks at all! You will figure out how to do this after looking at the examples below.
Another feature of timers is that you can create them as one-time (one-shot) or repetitive (auto-reload), and then, if necessary, change this behavior (FreeRTOS calls this feature the mode). Likewise, it is possible to change the period of a timer (that is, the time between calls) when the program is already running.
A core element of timers are the callback functions, so this is the first thing to review.
Callback functions
A callback function is a function, Fa, that you pass to another function, Fb, as a parameter for it to execute; that is, the Fb function receives and executes the Fa code.
Every time you create a timer you must pass a callback so that when the time expires this code is executed, in either of the two modes of operation of the timers (one-shot or auto-reload).
The signature of the callbacks that the timers use is like this:
void vCallbackFunction( TimerHandle_t xTimer);
That is, the function that you expect to run every time the timer’s time has expired does not return any results (void) and has a single parameter (TimerHandle_t).
For example, a callback update_display () function that updates a 7-segment display periodically would look like this (omitting the actual code):
void update_display( TimerHandle_t xTimer )
{
    // aquí el código que actualiza al display
}
The xTimer parameter (you can name it whatever you want) is used to know which timer called the callback. FreeRTOS allows different timers to call the same callback, therefore, it must know who called it to execute the correct code. But if your callback is called by a single timer, then you could ignore it, or better of, give it other uses!, as I’ll explain later.
Demons and daemons
The (hidden) task that manages all timers is call the timer daemon. As I said this task is internally created by FreeRTOS whenever you activate the timers sofware feature.
The term daemon has been used since the beginning of computers to indicate processes (or tasks) of the operating system that are both: not interactive and that are executed in a hidden way from the user.
When you enable timers in FreeRTOS, it creates a task that will be running without you noticing it (hence the term daemon) checking the completion time of each timer.
Enabling the timers
You need 4 simple steps to enable this functionality in your projects:
1st step. In the FreeRTOSConfig.h configuration file make sure you have the following lines (anywhere in the file):
#define configUSE_TIMERS                    1
#define configTIMER_TASK_PRIORITY           ( ( UBaseType_t ) 1 )
#define configTIMER_QUEUE_LENGTH            ( ( UBaseType_t ) 3 )
#define configTIMER_TASK_STACK_DEPTH        configMINIMAL_STACK_SIZE * 2
configUSE_TIMERS: Must be set to 1 to activate the timers functionality in FreeRTOS.
configTIMER_TASK_PRIORITY: The timers daemon ultimately is a task (internal to FreeRTOS) so it requires a priority. Low priority could result in commands not being executed and higher priority tasks not releasing the CPU to the daemon. High priority (coupled with poor design) could result in the daemon consuming all CPU time.
configTIMER_QUEUE_LENGTH: This is a command queue. A command is a call to the functions (which we will see later) that starts, stops, restarts or destroys the timers. Issuing the call does not mean that the instruction will immediately reach the daemon, and consequently, the referred timer. If there are tasks of higher priority to the daemon running, then each command is inserted into a queue, and once the daemon has aquired CPU time then the commands are pulled from the queue and effectively applied on the indicated timer. The value for this symbolic constant will depend on the system workload, the design, and the priority of the daemon.
configTIMER_TASK_STACK_DEPTH: This constant makes sense when dynamic object creation is enabled (configSUPPORT_DYNAMIC_ALLOCATION is set to 1). Here you set how much memory you want to give the daemon. In case of dynamic task creation is disabled, then you will need to provide memory statically allocated memory for the daemon.
2nd step. Make sure the files timers.h and timers.c are in the src folder where the rest of the FreeRTOS files are. In the KleOS project they are already where they should be, so you should not worry about it.
3rd step. If you’ve decided to create the timers using statically allocated memory (exclusively or together with the dynamically allocated memory way) then you must create a callback function to obtain RAM memory for the daemon (this callback has nothing to do with the timers callbacks). It sounds complicated, but you have nothing to worry about: FreeRTOS tells you how that function should be (you can see it here) and I’ve already put it where it belongs to; in other words, you don’t have to do anything, just to know it. (If you are interested, look in the src directory for the static_mem_callbacks.c file that I’ve added as part of the KleOS project.)
4th step. In the source files of your project where you are going to use the timers you must add the header file "timers.h":
#include <timers.h>
Let’s do it
Creating the timers
Both the daemon that manages the timers and the timers themself can be created with dynamically or statically allocated memory. Although for most of the examples that we will see I will be using the dynamically allocated memory form (since it is easier to implement), I remind you that the statically creation of objects is far better and more secure for reliable embedded systems.
The functions for the dynamic and static creation of the timers are almost identical, except for an extra parameter for the latter, so I am going to use the latter to explain the different parameters.
Static memory timers
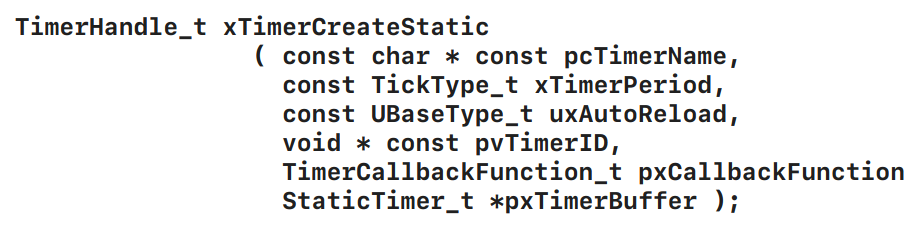
pcTimerName: It is a text string that represents a name that you want to give to the timer. FreeRTOS does not use it internally, but you can use it when you are debugging your applications. The name can be obtained later with the function pcTimerGetName ().
xTimerPeriod: It is the period, in ticks, of the timer. You can use the macro pdMS_TO_TICKS () to use milliseconds (ms) instead of raw ticks. For example, for a period of 500 ms, you would write pdMS_TO_TICKS (500).
uxAutoReload: This parameter selects the timer’s mode. When you write pdFALSE on this paramter you set the one-shot mode, while when you write pdTRUE you set the auto-reload mode. One-shot means that when the period expires the callback will be called and then the timer will enter into the dormant state until it receives a new start command. Auto-reload means that the callback will be called repeatedly each time the period expires without the need to send the start command over and over. The start command is sent calling the xTimerStart() function.
pvTimerID: The same callback can be called by several timers. In this parameter you can set an identifier that will help the callback determine which timer called it. Since this is a void * parameter you can also use it to pass data to the callback, or to make it hold a state (along with TimerSetTimerID() y pvTimerGetTimerID() functions).
pxCallbackFunction: It is the function that will be executed when the timer’s period expires.
pxTimerBuffer: (This parameter is only defined for the xTimerCreateStatic() function). It is a variable of type StaticTimer_t that FreeRTOS will use to save the timer’s state. You must create with global or static to function visibility.
Return Value: This function returns a handler of type TimerHandle_t. This handler is needed by all the functions of the timers to know which one they will operate on. In case the timer was not created then the returned value is NULL.
Example 1
Let’s see a simple example using statically memory allocated timers:
#include <FreeRTOS.h>
#include <task.h>
#include <timers.h>
enum { TMR_ONE_SHOT = pdFALSE, TMR_AUTO_RELOAD = pdTRUE };
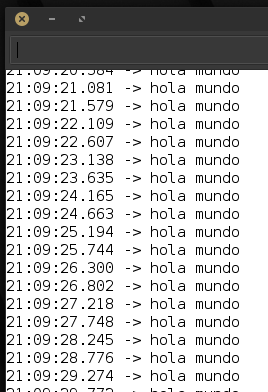
void callback( TimerHandle_t h )
{
Serial.println( "hola mundo" );
}
void setup()
{
static StaticTimer_t tmr1_state;
TimerHandle_t tmr1_h = xTimerCreateStatic(
"TMR1", // timer's name
pdMS_TO_TICKS( 500 ), // initial period
TMR_AUTO_RELOAD, // mode(pdTRUE = auto-reload)
NULL, // timer's ID (can be used to pass on information to the callback)
callback, // callback
&tmr1_state ); // timer's state variable
configASSERT( tmr1_h != NULL );
xTimerStart( tmr1_h, 0 );
// starts the timer
Serial.begin( 115200 );
vTaskStartScheduler();
}
void loop()
{
}
In this example we can observe several things:
- There is no task created by the user (you). The only activity in the program is carried out on the callback, which is called continuously by the timer daemon.
- That the fact that this example hasn’t created any regular task does not mean that it will always be this way; I mention it because it is interesting that we can create complete applications based entirely on timers.
- We save the timer’s handler that the function returns in a local variable to the
setup()function because it is in this same function, and for once in this example, where we use it. Most commonly, it is used by another function (a callback or a task). In those cases you will have to create the handler (that is, the variabletmr1_h) with global visibility.
As the timer was created statically, we had to create its state variable in such a way that it was permanent throughout the execution of the program. We had two options, make it global, or make it static to the function. I chose the latter because it is more secure:
static StaticTimer_t tmr1_state;
If you use the xTimerCreate() function instead, then this last step is not necessary.
You may have noticed that instead of writing the value pdTRUE (continuous mode) directly in the mode’s parameter I added an enum with symbolic constants; that’s not necessary, but the code speaks by itself:
enum { TMR_ONE_SHOT = pdFALSE, TMR_AUTO_RELOAD = pdTRUE };
The callback is very simple, and for this example it does not save any state or use the parameter associated with the handler of the timer that called it. We will see that in a next example.
The output is exactly as we expected it:
Functions to start, stop and restart the timers
Before looking at the following example, let’s take a moment to look at some of the functions that control the timer’s operation. Let’s start with the startup function, xTimerStart():

xTimer: It is the handler of the timer you want to start. You got this one when you created it.
xBlockTime: It is the waiting time, in ticks, for the command to reach the commands queue before aborting the operation. I already mentioned that issuing the instruction does not mean that the timer will receive it immediately, and in case the system is busy, it will be queued (did you remember the symbolic constant configTIMER_QUEUE_LENGTH?). To convert milliseconds to ticks you can use the macro pdMS_TO_TICKS() as usual. For an infinite timeout write portMAX_DELAY (for this feature make sure the INCLUDE_vTaskSuspend constant, in the FreeRTOSConfig.h file, is set to 1); you can write 0 to return immediately (that is, without any waiting). This parameter is ignored when the function is called before the scheduler starts, so in the previous example I wrote the value 0.
Valor devuelto: If the command could not be queued before the time set by xBlockTime expired, then it will return pdFAIL. In case the command does reach a place in the queue, then it will return pdTRUE. The instruction will actually be executed whenever the daemon gets CPU time.
A very important function that you may get to use frequently is the one that stops the timer, xTimerStop():

Los parámetros y el valor devuelto tienen el mismo significado que la función xTimerStart(). Esta función detiene al temporizador indicado por xTimer que previamente hubiera sido iniciado con la función xTimerStart(). La función no espera a que el tiempo expire; en cuanto el daemon recibe el comando el temporizador es detenido. Por supuesto que podrás volver a arrancarlo.
Un temporizador detenido con xTimerStop() se va al estado Dormant. Esto significa que el temporizador sigue siendo parte de sistema, está inactivo (no usa ciclos de CPU), pero, a diferencia del estado Blocked, no está esperando por ningún evento. Como mencioné, para volverlo a la vida deberás reactivarlo con la función xTimerStart() o xTimerReset().
Ejemplo: Arrancando y deteniendo temporizadores
Ahora sí, otro ejemplo. En éste crearemos dos temporizadores. Uno imprimirá texto, T1, mientras que el otro hará parpadear a un LED, T2. T1 detendrá y arrancará a T2 de manera repetida. Por otro lado, los temporizadores serán creados con memoria dinámica:
#include <FreeRTOS.h>
#include <task.h>
#include <timers.h>

enum { TMR_ONE_SHOT = pdFALSE, TMR_AUTO_RELOAD = pdTRUE };

#define BLINKS 3

TimerHandle_t led_h = NULL;
// el handler del timer asociado al LED debe ser global


void msg_callback( TimerHandle_t h )
{
   static uint8_t blinks = BLINKS;
   // usamos una variable estática para guardar el contador.
   // Este método no debe ser usado si la callback es compartida.

   static bool led_state = false;
   // idem


   Serial.print( blinks );
   Serial.println( ": hola mundo" );

   --blinks;
   if( blinks == 0 ) {
      blinks = BLINKS;

      led_state != false ?
         xTimerStart( led_h, portMAX_DELAY ) :
         xTimerStop( led_h, portMAX_DELAY );

      led_state = !led_state;
   }
}

void led_callback( TimerHandle_t h )
{
   static bool state = false;
   // usamos una variable estática para guardar el estado de esta callback.
   // Este método no debe ser usado si la callback es compartida.

   digitalWrite( 13, state );

   state = !state;
}

void setup()
{
   TimerHandle_t msg_h = xTimerCreate(
         "MSG",                // nombre
         pdMS_TO_TICKS( 1000 ),// periodo inicial
         TMR_AUTO_RELOAD,      // tipo
         NULL,                 // ID
         msg_callback );       // función a ejecutar

   configASSERT( msg_h != NULL );

   led_h = xTimerCreate(
         "LED",                // nombre
         pdMS_TO_TICKS( 125 ), // periodo inicial
         TMR_AUTO_RELOAD,      // tipo
         NULL,                 // ID
         led_callback );       // función a ejecutar

   configASSERT( msg_h != NULL );

   xTimerStart( msg_h, 0 );
   // inicia al timer "maestro"

   pinMode( 13, OUTPUT );
   // lo usa el timer LED

   Serial.begin( 115200 );
   // lo usa el timer MSG

   vTaskStartScheduler();
}

void loop()
{
}
La única información nueva que incluí en el ejemplo es la utilización de la constante simbólica portMAX_DELAY en las funciones xTimerStart() y xTimerStop(). Ésta se utiliza para indicarle a FreeRTOS que deberá esperar de manera indefinida por un evento; en otras palabras, que el tiempo de espera xBlockTime será infinito. Lo he hecho de esta manera para que supieras que puedes usarla en tus programas y por simplicidad. Sin embargo, recuerda que en un programa profesional deberás establecer un tiempo de espera para que el sistema responda correctamente ante posibles bloqueos.
Guardando el estado
En el ejemplo anterior guardamos estados y contadores marcando a las respectivas variables como static. Y funciona. Pero como mencioné en el código, éste método no es el adecuado cuando dos o más temporizadores comparten la misma callback. El siguiente ejemplo te muestra cómo utilizar el parámetro ID, junto con las funciones vTimerSetTimerID() y pvTimerGetTimerID(), para guardar un estado.
Antes del ejemplo revisemos muy rápidamente las firmas de dichas funciones:


El punto en común de estas funciones (junto con las de creación de los temporizadores) es que el parámetro para el identificador ID es del tipo void*. Este tipo es oro molido para nosotros los desarrolladores ya que se presta para realizar muchas cosas más allá de las que los diseñadores originales imaginaron. Es decir, la idea del parámetro (y sus funciones asociadas) es utilizarlo para asignar un ID del tipo que nosotros necesitemos (int o char, por ejemplo); sin embargo, void* es un lienzo en blanco que podemos utilizar, como lo muestra el siguiente ejemplo, para cosas completamente distintas:
#include <FreeRTOS.h>
#include <task.h>
#include <timers.h>

enum { TMR_ONE_SHOT = pdFALSE, TMR_AUTO_RELOAD = pdTRUE };

void led_callback( TimerHandle_t h )
{
   int state = (int)pvTimerGetTimerID( h );

   digitalWrite( 13, state );

   vTimerSetTimerID( h, state == LOW ? (void*)HIGH : (void*)LOW );
}

void setup()
{
   static StaticTimer_t tmr1_state;

   auto tmr1_h = xTimerCreateStatic(
         "TMR1",
         pdMS_TO_TICKS( 500 ),
         TMR_AUTO_RELOAD,
         NULL,                 // aquí podríamos pasar el estado inicial del LED
         led_callback,
         &tmr1_state );

   configASSERT( tmr1_h != NULL );

   vTimerSetTimerID( tmr1_h, (void*)HIGH );
   // el estado inicial del LED es HIGH

   xTimerStart( tmr1_h, 0 );


   Serial.begin( 115200 );

   pinMode( 13, OUTPUT );

   vTaskStartScheduler();
}

void loop()
{
}
Temporizador one-shot
Los ejemplos vistos hasta el momento han utilizado el modo auto-reload, el cual inicia de forma continua al temporizador. Sin embargo, en ocasiones vamos a querer iniciar un temporizador y que al finalizar su tiempo realice alguna acción, y ya; es decir, hará su tarea una sola vez. De ser necesario el programa volvería a arrancarlo.
Esta característica nos puede servir para establecer un tiempo para una acción y olvidarnos de ella (nosotros como programadores, no así el sistema operativo); esto es, nuestras tareas no ocuparán ciclos de CPU para estar revisando si el tiempo terminó.
Ejemplo
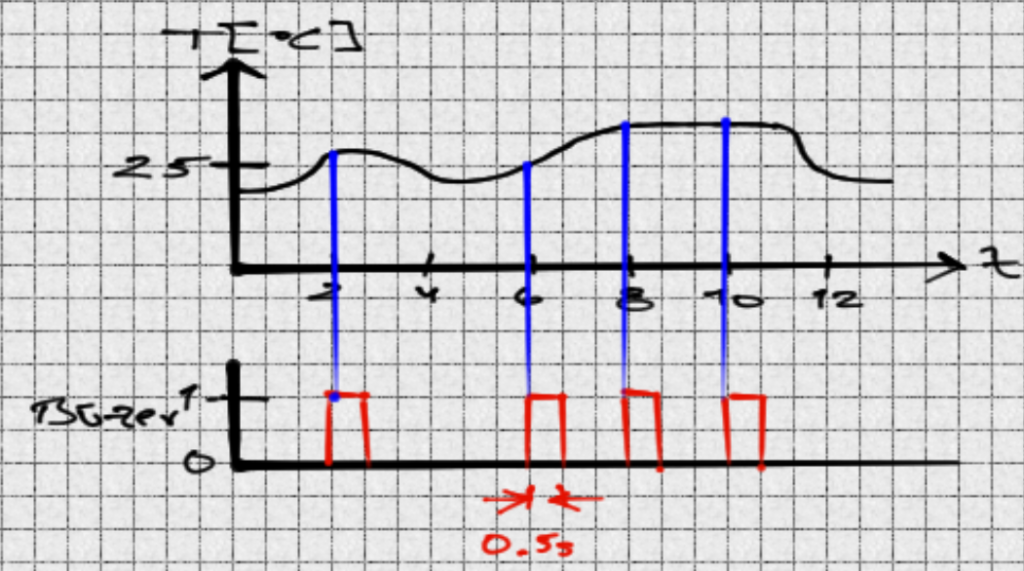
Imagina que estás escribiendo un sistema que necesite emitir un sonido intermitente mientras la temperatura de un proceso se mantenga por encima de un cierto nivel, solamente para llamar la atención (lo cual es diferente de una alarma donde la señal sería contínua hasta que alguien resuelva el problema). Por supuesto que podrías escribir el código que se encarga de esto en una de tus tareas, pero un temporizador en modo one-shot te simplificará la vida como lo muestra el siguiente código:
#include <FreeRTOS.h>
#include <task.h>
#include <timers.h>

enum { TMR_ONE_SHOT = pdFALSE, TMR_AUTO_RELOAD = pdTRUE };


TimerHandle_t beep_h = NULL;


void read_task( void* pvParameters )
{
   TickType_t last_wake_time = xTaskGetTickCount();

   while( 1 )
   {
      vTaskDelayUntil( &last_wake_time, pdMS_TO_TICKS( pdMS_TO_TICKS( 2000 ) ) );

      float temp = ( analogRead( A0 ) * 5.0 * 100.0 ) / 1024;
      // el sensor es un LM35

      if( temp > 25.0 ){

         // aquí apagaríamos al actuador

         digitalWrite( 13, HIGH );
         // simulamos que activamos la señal audible

         xTimerStart( beep_h, portMAX_DELAY );
         // arrancamos al timer
      }

      Serial.print( "Temp = " );
      Serial.println( temp );
   }
}

void beep_callback( TimerHandle_t h )
{
   // llegaremos aquí cuando el tiempo expire

   digitalWrite( 13, LOW );
   // simulamos que desactivamos la señal audible
}

void setup()
{
   xTaskCreate( read_task, "TEMP", 128, NULL, tskIDLE_PRIORITY, NULL );
   // esta tarea realiza las lecturas. Pudo haber sido un timer también,
   // pero quise cambiarle un poco

   beep_h = xTimerCreate(
         "BEEP",               // nombre
         pdMS_TO_TICKS( 500 ), // duración del beep
         TMR_ONE_SHOT,         // una sola vez
         NULL,                 // no lo usamos
         beep_callback );      // función a ejecutar

   configASSERT( beep_h != NULL );

   pinMode( 13, OUTPUT );
   // emula a un búzer

   Serial.begin( 115200 );
   // lo usa la tarea principal

   vTaskStartScheduler();
}

void loop()
{
}
Un diagrama de tiempo de este ejemplo es así:
Reiniciando al temporizador
El último tema que veremos en esta lección es sobre el reinicio (reset) de los temporizadores, a través de la función xTimerReset().
Esto es, puedes hacer que el tiempo se reinicie mientras el temporizador está activo. Una aplicación que se me ocurre es la luz de fondo (backlight) de una pantalla LCD de 16×2. Cuando el usuario presione una tecla la luz del LCD se encenderá por, digamos, 5 segundos. Si el usuario no volviera a presionar ninguna tecla dentro de esa ventana de tiempo, entonces la luz se apagaría; pero si el usuario presionara una tecla dentro de la ventana, entonces el temporizador se reiniciaría a 5 segundos otra vez. Y así sucesivamente mientras el usuario siga presionando teclas. Un ejemplo alternativo, pero similar, es de un sensor de presencia que mientras detecte que hay gente en un pasillo mantendrá las luces encendidas; una vez que deja de detectar personas y la ventana de tiempo se cierra, entonces las luces se apagan.
La firma de esta función es:

Los argumentos y el valor devuelto tienen el mismo significado que los de las funciones xTimerStart() y xTimerStop(), por lo cual no los voy a repetir aquí.
Un punto interesante a destacar, y que facilita la programación, es que si el temporizador está activo, entonces el tiempo se reinicia; pero si el temporizador está inactivo (es decir, en estado Dormant), entonces esta función lo arrancará, como si hubiese sido una llamada a xTimerStart().
El siguiente programa simula el encendido de la luz de fondo de un LCD:
#include <FreeRTOS.h>
#include <task.h>
#include <timers.h>

enum { TMR_ONE_SHOT = pdFALSE, TMR_AUTO_RELOAD = pdTRUE };


TimerHandle_t button_h = NULL;
TimerHandle_t backl_h = NULL;


void button_callback( TimerHandle_t h )
{
   static uint8_t state = 0;

   static uint8_t ticks = 0;

   uint8_t pin = (uint8_t)pvTimerGetTimerID( button_h );
   // recuperamos el pin donde está conectado el push-button

   switch( state ) {

   case 0:
      if( digitalRead( pin ) == LOW ){
         state = 1;

         ticks = 5;
         // debouncing de 50 ms (10ms * 5)

      }
   break;

   case 1:
      --ticks;
      if( ticks == 0 ){

         if( digitalRead( pin ) == LOW ){

            digitalWrite( 13, HIGH );
            // encendemos la luz de fondo del LCD

            xTimerReset( backl_h, portMAX_DELAY );
            // si el timer está activo, lo reinicia;
            // en caso contrario lo arranca (como lo haría xTimerStart)

            state = 2;
            // esperamos a que deje de presionar el push-button

         } else{ // fue ruido:
            state = 0;
         }
      }
   break;

   case 2:
      if( digitalRead( pin ) != LOW ) state = 0;
   break;

   default:
      state = 0;
   break;
   }
}

void backl_callback( TimerHandle_t h )
{
   digitalWrite( 13, LOW );
   // apagamos la luz de fondo del LCD
}


#define PUSHBUTTON_PIN 2

void setup()
{
   button_h = xTimerCreate(
         "BTN",
         pdMS_TO_TICKS( 10 ),
         TMR_AUTO_RELOAD,

         (void*) PUSHBUTTON_PIN,
         // usamos al campo ID para pasar el número de pin

         button_callback );

   backl_h = xTimerCreate(
         "BCKL",
         pdMS_TO_TICKS( 5000 ),
         TMR_ONE_SHOT,
         NULL,
         backl_callback );

   pinMode( 13, OUTPUT );
   // emula a la luz de fondo del LCD

   pinMode( PUSHBUTTON_PIN, INPUT );
   // nuestro push-button

   Serial.begin( 115200 );
   // lo usa la tarea principal


   xTimerStart( button_h, 0 );
   // arrancamos al temporizador "maestro"

   vTaskStartScheduler();
}

void loop()
{
}
La API de FreeRTOS y las interrupciones
En todos los ejemplos que hemos visto a lo largo de este curso hemos estado llamando a las diferentes funciones de FreeRTOS desde nuestras funciones y tareas; sin embargo, en la vida real vamos a querer obtener la misma funcionalidad desde las interrupciones.
Muchas de las funciones de FreeRTOS que hemos visto (y muchas otras que no hemos visto) no deben ser llamadas desde una interrupción, so pena de un mal-funcionamiento del programa. Para esos casos FreeRTOS provee funciones espejo que pueden ser llamadas con toda seguridad desde dentro de una interrupción. Estas funciones espejo tienen la terminación FromISR():
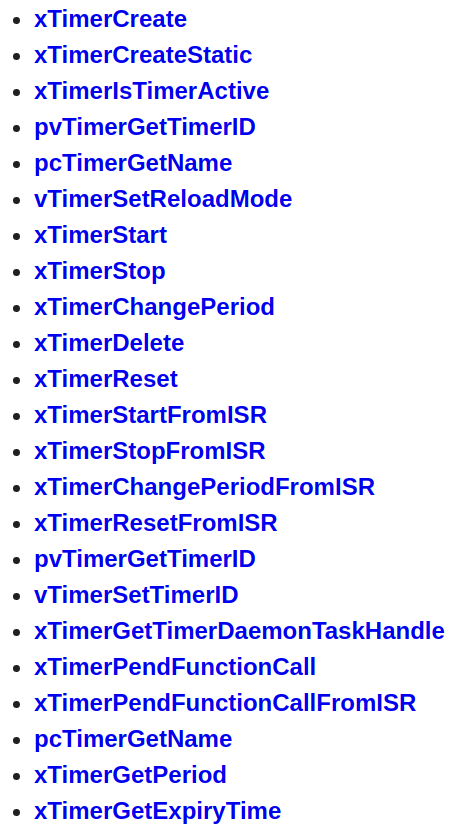
En el caso que nos ocupa en esta lección, de la imagen anterior podrás observar diversas funciones con terminación FromISR(). Esas son las que debes llamar si lo necesitas hacer desde dentro de una interrupción (ISR son las siglas de Interrupt Service Routine).
RECUERDA
Cuando tengas que llamar a alguna función de FreeRTOS desde una interrupción, verifica que estás llamando a la versión correcta.
¿Qué sigue?
Los temporizadores (software-timers) son una adición reciente de FreeRTOS que, como pudiste observar, simplifican nuestras aplicaciones gracias a que la administración de los diferentes temporizadores se delega a una tarea central integrada en el sistema operativo (el daemon). Y seamos honestos, mucho de nuestro tiempo de diseño y desarrollo lo invertimos en actividades temporizadas, y lo queramos o no, terminamos escribiendo temporizadores. Cuando nos veamos haciendo esto deberíamos considerar utilizar los software timers tomando en cuenta que si dichas actividades son complejas, escogeríamos las tareas; pero si no son tan complejas, escogeríamos temporizadores.
En esta lección vimos las operaciones más importantes de los temporizadores, pero como viste en la imagen de la API de los mismos, hay muchas más funciones, las cuales puedes revisar por tu cuenta. Sin embargo, con lo que estudiamos es suficiente para que comiences a integrarlos a tus aplicaciones.
RECUERDA (otra vez): Cuando llames a funciones de FreeRTOS desde interrupciones, verifica que estás llamando a la versión correcta. (Debía insistir en este punto.)
En la siguiente lección veremos semáforos binarios y semáforos contadores utilizando las notificaciones directas a las tareas (direct to task notifications). Éstas ya las vimos, pero ahora lo haremos desde el punto de vista de la sincronización de tareas.
Espero que esta entrada haya sido de tu interés. Si fue así podrías suscribirte a mi blog, o escríbeme a fjrg76 dot hotmail dot com, o comparte esta entrada con alguien que consideres que puede serle de ayuda.

Mi perfil completo lo puede encontrar en: https://www.linkedin.com/in/fjrg76-dot-com/
- Arduino and ESP32 whims - diciembre 17, 2025
- Writing Scalable Firmware: Implementing the Command Pattern in C++ - diciembre 4, 2025
- Patrón de diseño de software Command para sistemas embebidos para los no iniciados - noviembre 30, 2025
1 COMENTARIO