Count pulses (almost without your interventation) with the Blink class
(Lee este artículo en español aquí.)
The other day I started thinking about a class similar to the Blink one but to count pulses. And while wondering how I could use it and how it could work I had an epiphany: «This class I’m thinking of looks a lot like the Blink class, could I use this instead of writing a new one?».
«And if the .state_machine() method is called on every received pulse instead of every system time tick, will it work for what I’m thinking?». Eureka! I can reuse something I had already written. And that’s why I love object-oriented programming.
Tabla de contenidos
First example
The secret of counting pulses is precisely to call the .state_machine() method on every pulse the system receives, whether the pulse comes from an interrupt or by polling. And that’s all the changes we need to do!
Then I started working on a first simple example as a proof of concept. Since it is easy to activate pulse interrupts in the Arduino platform I did the following experiment:
Blink pulses;

void pulse_ISR()
{
   pulses.state_machine();
}

void setup()
{
   pinMode( 2, INPUT_PULLUP );
   attachInterrupt( digitalPinToInterrupt( 2 ), pulse_ISR, FALLING );

   pinMode( LED13, OUTPUT );
   pulses.begin( LED13, Blink::ePolarity::ACTIVE_HIGH );
   pulses.set( Blink::eMode::FOREVER, 5, 5 );
   pulses.start();
}

void loop()
{
   // nothing (for now)!
}
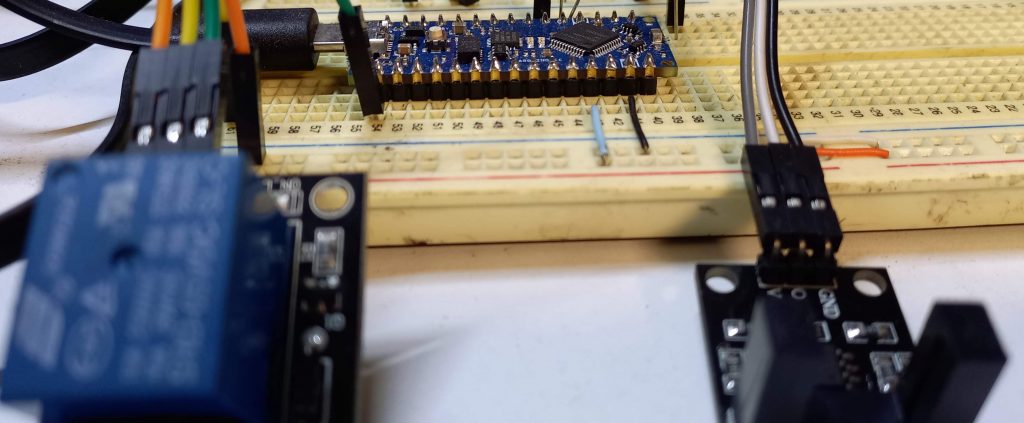
To test this example I used an Arduino Nano Every board, an optical slot sensor and a relay wired to pin D13:
setup() function
Before going further, we must declare an object of type Blink. This object, the one we are using throughout this explanation, will process the pulses:
Blink pulses;
The object pulses must be declared at the global scope due to the fact that it interacts with the hardware, and that it can also be controlled on different functions. In any other situation we should avoid global variables.
The setup() function performs 5 actions:
- Configure pin 2 as input with a pull-up resistor (the latter is not strictly necessary if your circuit already includes it).
- Configure pin 2 as the interrupt source every time the pin goes from high to low (falling pulse). It also sets that the callback function
pulse_ISR()is called on each pulse detected. - Set the pin D13 as the output pin actuator, that is, the one that will be activated/deactivated under the control of the Blink class.
- Configure the pulses object to activate/deactivate the actuator pin every 5 pulses, ever forever. Of course you can change these values according to the logic of your program and needs.
- Start the state machine associated with the pulses object through the
.start()method.
void setup()
{
   pinMode( 2, INPUT_PULLUP ); //(1)
   attachInterrupt( digitalPinToInterrupt( 2 ), pulse_ISR, FALLING ); //(2)

   pinMode( LED13, OUTPUT );
   pulses.begin( LED13, Blink::ePolarity::ACTIVE_HIGH ); //(3)
   pulses.set( Blink::eMode::FOREVER, 5, 5 ); //(4)
   pulses.start(); //(5)
}
loop() function
void loop()
{
   // nothing (for now)!
}
Note something very important in the loop() function: there is no code! All the magic is carried out in the .state_machine() method associated with the pulses object. Can it be even simpler than that? How would you have done it without using the Blink class? How many lines of code would you’ve written?
In this example we have not had to include code beyond what is necessary for the configuration. However, it won’t always be that way: everything will depend on the logic of your application and the configuration of the Blink objects, as Example 2 below will demonstrate.
pulse_ISR() function
The pulse_ISR() function is what we call a callback function, that is, a function that we inject into the system:
attachInterrupt( digitalPinToInterrupt( 2 ), pulse_ISR, FALLING );
so that it’s called later as need. Callback functions are very useful for injecting our own functionality into code that doesn’t belong to us, or code that should be loosely coupled.
In this way, each time a pulse is present on pin D2 the system will call the callback function pulse_ISR(), which in turn will calls the state machine associated with the pulses object. Easy, doesn’t it?
NOTE: Someone may be wondering why we didn’t put the pulses.state_machine() statement as a callback function directly. The answer is simple: All methods include a hidden pointer (the this pointer) and therefore no method, including .state_machine(), would fullfil the signature expected by the attachInterrupt() function. We could fix this by marking the method .state_machine() as static, but we would no longer be able to have other Blink class objects independent for pulses counting.
Example 2
For this example I pictured in my mind an industrial machine that, after the operator presses a start button, a cylinder coupled to a low speed motor starts turning, and after a count of 5 it will turn off until the operator presses again the start button:
Blink pulses;

void pulse_ISR()
{
   pulses.state_machine();
}


void setup()
{
   pinMode( 2, INPUT_PULLUP );
   attachInterrupt( digitalPinToInterrupt( 2 ), pulse_ISR, FALLING );

   pinMode( LED13, OUTPUT );
   pulses.begin( LED13, Blink::ePolarity::ACTIVE_HIGH );
   pulses.set( Blink::eMode::ONCE, 5 );

   pinMode( 3, INPUT );
   // external push button as start switch or operator start button, etc

}

void loop()
{
   if( digitalRead( 3 ) == 0 and not pulses.is_running() )
   {
      while( digitalRead( 3 ) == 0 ) ;
      // wait until the button is released

      pulses.start();
      // turn on the actuator and start the pulse counting
   }
}
The difference with the previous example, apart from the fact that we are adding an extra button, is that the pulses object mode has been set to ONCE (instead of FOREVER mode); that is, once you start the process (by calling the .start() method each time the button is pressed) the pulses object will «turns on», in the example, a motor through the actuator, and after the pulse count has been completed, the pulses object itself “turns off” the motor and then it sits again waiting for the user button to be pressed again.
Let me repeat the above question, how would you have done it? Would you have used fewer lines of code?
Source code
Here you can grab a copy of the examples’ source code as well as the Blink class (for counting system ticks). You can always get the development release here.
Final words
Remember that the fewer lines of code a program has, the better, since it will be easier to analyze, debug and modify; In other words, fewer program lines equals fewer headaches and more time for sleeping (and dreaming about programming).
I hope that this class will serve you as much as it has for me and that you tell me in the comments in which situations you have used it or if you would use it ever.
If you want to know a little bit more on event-driven programming on Arduino please read this article.
If you want to know a little bit more on using the FreeRTOS operating system along Arduino you might want to read this articles (they are in spanish, although I developed the KleOS project in english and it works on the Arduino ONE and the Due):
- KleOS: Arduino + FreeRTOS + Arduino from the command line. Un artículo aquí y otro por acá.
- Curso de Arduino en tiempo real (in spanish).
Fiverr LinkedIn YouTube Instagram Facebook
¿Ya conoces mi curso gratuito de Arduino en tiempo real, utilizando el Arduino UNO o el Arduino Due y FreeRTOS?
Subscribe, is free and it will motivate me to keep writing!

Mi perfil completo lo puede encontrar en: https://www.linkedin.com/in/fjrg76-dot-com/
- Arduino and ESP32 whims - diciembre 17, 2025
- Writing Scalable Firmware: Implementing the Command Pattern in C++ - diciembre 4, 2025
- Patrón de diseño de software Command para sistemas embebidos para los no iniciados - noviembre 30, 2025
1 COMENTARIO